Thursday, November 15, 2012

Isn't She Lovely!! My Roasted Chicken

You've seen her on facebook, pinterest, and twitter! And some of you have even seen her attached to text messages! But you can only get the scoop on her, right here! Ladies and gentleman, please welcome...............................................................my roasted chicken!!!!!! (applause, applause)

A friend of mine has been asking me about my roasted chicken since I showed her a picture of it. So I dedicate this to my dear friend EP aka A.A.

Before we dive in, just a few notes about purchasing a chicken. I'm quite particular about the quality of the food that I buy, especially poultry. Nowadays you see all kinds of labels such as "natural" and "hormone free" in order to describe the quality of the chicken. Some of these labels, however, do not mean much. Here's an excellent article that breaks down all this label mumbo jumbo: Supermarket Guide to Buying Chicken

I write(say) all that to advise you to be sure you know what you are putting into your body. It is your temple, and you only get one.

Well, let's get started!

1 3-4 lb. chicken
olive oil
1 Tsp. salt
1 Tsp. pepper
1 Tsp paprika 
20-25 stems of thyme
1 Tsp. nutmeg
5 stems of rosemary
9 cloves garlic
2 shallots
1 1/4 cup chicken broth


Preheat oven to 375°F. Wash chicken thoroughly. Remove any excess fat or skin from the neck and bottom.


(Before washing)


(After washing and cutting away excess fat and skin)

Prepare your shallots and garlic by cutting them length-wise. Only cut 5 of the garlic cloves and one of the shallots.
The garlic should look like little chips. Place them in a cast iron skillet with 3-4 tablespoons of olive oil.
Add the shallots and let them start to brown slowly (keep the heat on a very low temperature so they do not brown to quickly while you finish preparing).
Now let's move back to our chicken! 

Grab 3 stems of rosemary and 7-8 stems of thyme and stick them inside the chicken.Take the remaining shallot (cut into three to four large length-wise pieces) and the four cloves of garlic (not cut) and stuff them in side the chicken as well.


Wash your hands! And turn up the temperature on the garlic and shallots slightly so they can start to brown a little more. Now let's season the outside of the chicken.


Put the salt, paprika, pepper and nutmeg on the chicken. Then pull the leaves off of the remaining thyme stems.


Pull the needles off of 2 rosemary stems and place on top of the chicken.
 Pour 1/4 cup of olive oil over the chicken.


Time to get a little messy! Use your hands to rub the spices into the chicken. Make sure you rub under the skin of the chicken as well. And make sure everything is coated. 


Use some tongs to lift your chicken (one of the tong arms should be on the inside of the chicken) and place in the skillet.
Sear both sides of the chicken on medium heat for 3-5 minutes on each side. The skin of the chicken should be slightly brown. The purpose of this is to lock in some of the flavors. 


 This is what one seared side should look like.
After you have seared both sides, pour the chicken broth in the skillet and transfer this little lady into the oven.
 Let her hang out in the oven for an hour.
MEANWHILE, take sometime to clean up your prep areas.


After an hour, take the chicken out and baste the chicken with some of the broth that the chicken has cooked in for the past hour. Put it back in the oven for an additional 35 minutes.


And there she is! She's finished! 

Let her rest for at least 20 minutes before you dig in and don't be afraid to use the broth in the bottom of the pan. I like to put it over Brown Rice.
Try to resist the temptation to play Stevie Wonder "Isn't She Lovely" when it comes out the oven. 

Friday, November 9, 2012

Roasted Zucchini

Zucchini! Did you know it has more potassium than a banana? It's also low in calories, fat free, cholesterol free, low in sodium, rich in manganese and vitamin C (Sources: Food ChannelFriend Seat Blog). 

Trader Joe's has these great little baby zucchini and I love roasting them. So here is a simple recipe for roasting them with a little Parmesan cheese. And no worries if you can't find the baby zucchini. You can use regular zucchini and cut them into smaller pieces. The baby zucchini are about $4 a bag. 


Ingredients
2 bags of baby zucchini
OR 
1 lb zucchini, each cut lengthwise twice, and then cut in half across the middle
3/4 cup olive oil
3 Tbsp Kosher salt
Freshly ground black pepper
1 1/2 cup of grated Parmesan cheese (optional)


Preheat oven to 400°F. Cut the baby zucchini in half (if you have regular zucchini then cut each of them down into about eight pieces). Align the zucchini pieces on a cookie sheet lined with a piece of foil.


Drizzle the olive oil over the zucchini. Next, sprinkle the salt and pepper over them.

Lastly, put the Parmesan on top (this again is optional).


Place in heated oven on the top rack and cook for 15- 20 minutes.


 And there you have it! How does it taste?


Make Use of Your Weekends and COOK

My favorite comment from people that would like to cook more but don't is................................I don't have time. I'm here to tell you that you do! And I don't want to hear otherwise. So let's talk about how you can MAKE time to cook.

First off, let's think about is from a financial standpoint. Start adding up how much you spend each week on eating out/picking up food? According to the Center for Science and Public Interest, Americans spend about $222 billion dollars eating out (Source: Calorie Costs). I challenge you to keep your receipts for the week to see how much money are you spending. I would estimate you (if you buy a lot of your meals out) spend about $25 every day on food (that's a conservative estimate).

So now let's talk about how to keep some of these dollars in your pocket so you can save for that island vacation AND take better care of your health. I actually looked for an article on why cooking on the weekend is beneficial and there isn't one! Looks like a job for the Single Sista!! The inspiration for encouraging people to cook on the weekends actually stems from my southern upbringing. The big Sunday feasts were not made on Sundays alone. My grandmothers cooked and prepared things on Saturdays so that after church all they had to do was warm the food.  

According to the Single Sista (that's me), by cooking on either Saturday or Sunday you:
  1. Eliminate the post-work conundrum of wondering what you are going to have for dinner
  2. Are less likely to pick up something from a fast food restaurant
  3. Can eat dinner early in the evening and give your food time to digest
  4. Can sit down with friends or loved ones and enjoy a real meal
  5. Have food that you can take to work for lunch
  6. SAVE MONEY!
And now for some tips!
  1. Spend a few minutes thinking about what you would like to make BEFORE you head to the grocery store so you can make a list. Better to go to the grocery store armed with a list than to figure out what you think you want when you get there. Also keeps you on YOUR BUDGET. 
  2. Make sure it's a balanced meal as. Refer to Choose My Plate for more on what your portions should look like. Make sure there are some veggies on your plate. 
  3. Figure out the best time for you to cook. Is it Saturday morning? Sunday while watching football (my favorite time to cook)? Set aside the time on a weekly basis and do your best to commit to it.
  4. Prepare meals for both lunch AND dinner. You quite honestly will get tired of eating the same thing for lunch and dinner. For lunch, you may want to have a different vegetable/side from the one you are planning to have for dinner. For examine, if you bake some chicken, you can have that with a salad at lunch but have it with some brown rice and some roasted asparagus for dinner (just as an example). 
  5. Consider one pot/one pan meals. A stew or a baked pasta (with veggies and whole wheat or gluten-free pasta of course) are always a bonus. AND let's not forget our old buddy the crock pot. Crock pot meals are wonderful because you do not have to stand over the stove and watch it.
  6. Explore various resources for ideas on what you should make. Basically, have a game plan! Here are some suggestions for where to get recipe ideas:
    • Watch some cooking shows. I often watch a few cooking shows on Saturday mornings to get inspiration for what I may want to prepare. It's easy to go online to get the recipe so that you can see all the ingredients and prep needed. Obviously you should remember to be reasonable and don't pick something that will have you buying random and expensive spices and ingredients. Some seafood dishes, for example, can become quite pricey (unless you are talking about tilapia or shrimp).  
    • Subscribe to a few cooking/food blogs (like Single Sista's Dish) for free recipes. 
    • Pick up a magazine at the grocery store. I have often done this, especially when I see a recipe for something I want to make on the cover. There are several that are geared towards specific dietary needs like weight loss, low-sodium, etc.
    • Ask your friends and family. I often get inspiration from them.
Try cooking on the weekend a few times and let me know if you run into any issues. I would love to hear from you!

All the BEST!

Wednesday, November 7, 2012

Another Fall Classic - Acorn Sqaush

So the researcher and public health professional in me feels the need to give you a few nutritional facts about acorn squash. Similar to its winter squash cousin the butternut squash, acorn squash, according to Fruits & Veggies More Matters, is fat free, cholesterol free, sodium free and a good source of vitamin C (source: Fruits & Veggies More Matters). It's also a source of antioxidants and has potential blood sugar regulating properties (source: World's Healthiest Foods). And last, but certainly not least, it's an affordable item! They are roughly $1.29 each and your will get two servings out of each squash. So for the single folks out there, you'll spend LESS than $3.00 on two and you've got four side dishes for the week!

So there recipe I have for you is fairly simple. The cook time on these however is over an hour so make sure you give yourself some time before you settle down to eat.

Ingredients

2 Acorn squash
4 Tsp Cinnamon
2 Tsp Nutmeg
2 Tsp Cardamom
4 Tsp Butter
2 Tsp Brown Sugar
4 Tbsp Maple Syrup

Let's get cooking! Preheat oven to 400°F.


Using a strong chef's knife cut the acorn squash in half, lengthwise. Be very careful doing this and make sure you have a good knife.


Scoop out the seeds and pulp (the stringy stuff) with a spoon.


Score (cut horizontal and vertical lines) into the insides of each half several times with a sharp knife.
Add your "butter" (I used Earth Balance), then add your spices (cinnamon, cardamom and nutmeg), the brown sugar, and the maple syrup. Sorry I forgot to get a picture of the squash halves all dressed up before I put them in the oven. Place each half in a baking pan, cut side up. Add about a 1/4 inch of water to the bottom of the baking pan. This is to keep the outside of the squash from drying out.

Bake in the oven for 1 hour 15 minutes, until the squash is very soft. It can take up to 1 hour and 30 minutes. When it is done, you will be able to insert a fork into into the squash with ease. Do not undercook.


When finished, remove from oven and let cool a little before serving. Spoon any buttery sugar sauce that has not already been absorbed by the squash over the exposed areas. I went ahead and mixed mine together so that flavors could be absorbed into the squash.

For storage I just wrapped each of the squash halves in foil. That way, when you are ready to eat one, you can just turn your oven on to 350 and warm it up in the oven! TADA!

Wednesday, October 24, 2012

The Perfect Pot of Brown Rice

Step away from the white rice!

I know you have heard by now that you should be eating whole grains. And I am not talking about just eating a bowl of cereal that has a whole grain label on the front. I am talking about preparing your own meals with whole grains.

Why whole grains? Because they are good for you! Overall, eating whole grains is linked to having a healthier life. Not convinced yet? Then let me refer you to the experts. Check out this article from the Harvard University School of Public Health about the importance of eat whole grains. The right hand column lists some great examples of whole grains. And with that, today's post is all about brown rice. But don't worry, there will be posts about black rice, quinoa, bulgar wheat, and other grains in the near future. 

You do know that white rice is actually brown until they strip all the nutrients off of the grain? Well, you definitely know now! The Harvard University School of Public Health conducted a study on rice consumption and found that consuming brown rice can lower your risk of developing type 2 diabetes. Here's the CNN summary of the study.

So now, have I convinced you to run out and get a bag of brown rice before you make your next meal? GREAT! But wait just a second. Before you make it, let me walk you through how to make a pot of rice you will enjoy. The first time I made a pot of brown rice it left a lot to be desired. It was almost like eating oatmeal and had no flavor at all. On another occasion, I undercooked it and it was awful. But you don't have to go through that because I am here! Aren't you glad you have me :)

Let's begin!

Ingredients:
2 c. brown rice or brown basmati rice
2 T. extra virgin olive oil
1 small bay leaf
1/4 cup of minced shallots
2 minced garlic cloves
2 cups of chicken stock (you can also use veggie or beef stock)
2 cups of water 
1 teaspoon of Kosher salt
1 teaspoon of black pepper
Heat your olive oil in a pot over medium high heat. Add your minced garlic, shallots, bay leaf, salt and pepper. (Note: I added a cinnamon stick to it to see if that enhanced the flavor. If you are feeling adventurous you can try it. The flavor was subtle but you can also just stick with my recipe as is.)


 Add your rice and stir it for a couple minutes, gently toasting it in the seasoned oil.


 Finally, add 2 cups of stock and 2 cups of water to the pot (During the holidays, I will show you how to use the stock from the turkey to make an even more flavorful pot). Bring to a boil, reduce the heat to low (turn the knob to about 2), cover with a lid and simmer  and cook for 45 minutes until rice is cooked. Start checking the rice after about 40 minutes. When it is done you should not be able to hear so see any liquid.


AND Voilà!

 Discard the bay leaf (and cinnamon stick if you used one) after it has cooled.

This rice goes well with TONS of dishes! And I am not just saying that because I made it :) 

And if you are anxious and would like to see some more whole grain recipes, check out 15 ways to eat whole grains

Enjoy! And feel free to send an email letting me know how it turned out!

~Peaches


Monday, October 22, 2012

For a Meatless Monday

Yes, Meatless Monday! If you have not heard by now there is a large movement to encourage people to choose one day a week to not eat meat. According to this CNN Article, this movement started in 2003 and research indicates that meatless meals lower your carbon footprint and is good for your overall health. I have always been an advocate for this movement because I believe you can come up with some wonderful and filling meals without meat. My mom has actually been doing this since I was a kid so I like to think she really started this trend.

Read more about the Meatless Monday movement here. Notice that Robin Roberts and Oprah also support this movement.

And to SHOW you that I really do believe in meatless meals, here are a few of my dishes.

Harvest grain blend, grilled baby zucchini, and grilled corn. 


The infamous meal I like to call "vegetarian's paradise" which consists of a baked sweet potato, sauteed purple cabbage, collard greens, sauteed corn with red peppers and poblano pepper, brown rice, quinoa, black beans with a hot pepper sauce (Bryant Terry's Hot Pepper Sauce), and a corn bread fritter (aka a hoe cake to my fellow southerners). No worries, this was was a shared plate.


Black bean cakes over a bed of brown rice and quinoa with hot pepper sauce (same recipe as above).

And these next two dishes might surprise you! RAW (YES RAW) Mock stir fry vegetables. This dish was from my three week journey of eating nothing but raw food. And it was REALLY good! I used Bragg's amino acid to marinate the ingredients. So no cooking at all with this dish. Snow peas, carrots, bean sprouts, mushrooms, and broccoli.

RAW pizza! I found the raw bread I used for the crust from somewhere (probably Whole Foods) and then topped it with a raw cheese made from cashews (I do believe) and then some marinated mushrooms and a raw cheese crumble. And the green dollop is an avocado sauce. It was rather tasty too!

Here's a GREAT looking recipe I found recently that is on deck to make: Portabella Mushroom Pizza

Any favorite meatless dishes you want to share? Email me at singlesistasdish@gmail.com!

Hope your week is off to a GREAT start!

Friday, October 19, 2012

Cooking with Apples!

Cider-glazed baked apples (maybe even with a touch of bourbon), apple pie, apple cobbler (my specialty),  skillet baked apples, it's all yummy to me. Now is a great time to take a trip out to an apple orchard (planning to do this with my friends very soon) and pick some fresh apples while enjoying a cup of nice hot apple cider. And then you come home and turn those apples into something magical.

I can across this recipe today and it looks like something that will be on deck very soon: Apple Cake with Honey Sauce

There are ways to make tasty apple treats less fattening and portion controlled. For instance, I am an advocate for Earth Balance instead of butter. Same flavor as butter but vegan friendly. You can also use raw local honey to sweeten your desserts instead of sugar. I will save the rant about different sweeteners for another post but just in case you want a preview here is a good site: Sweeteners

I have also used the little puff pastry cups (for portion control) and served baked fruit in them with a dollop (there's my favorite word again) of whip cream. I actually prefer whip cream over ice cream. Here's a little snap shot of some puff pastry with some baked apples in a little ramekin.

For you "I want all the flavors and ingredients folks" Here a picture of a pie I made for my Bubbie (grandmother) a little while back. It was so YUMMY!

My Bubbie taught me that pears and apples together can take a cobbler to another level! Try it some time!

What are some of your favorite recipes with apples?

Tuesday, October 16, 2012

Chilli Time!!

Fall is in FULL swing (BIG smile), despite the random 75+ degree weather we had on Sunday. I've said it once I will say it again, I LOVE warm weather food!!

So I have been talking about it and now it's time to DISH about my chilli. My recipe is based on one by Emeril. He has several but since I work with ground turkey I started with one that he specifically created for ground turkey. Now, I know what you're thinking, "I thought she was going to have a completely original recipe." While a lot of my recipes are my own, I do use recipes from other chefs and cooks as the basis for some of my dishes. Think of it as writing a paper in college or graduate school. You have to cite all the well-known scholars and their contribution of the field and then you add your own perspective (flavor if you will). Cooking is the same way!  

So let's start with the ingredients!

Ingredients

  • 1/4 cup olive oil
  • 2 cups chopped yellow onions 
  • 1 cup of diced shallots (these are small purple looking onions)
  • 3/4 cup diced red bell pepper (roughly 2/3 of the pepper)
  • 3/4 cup diced green bell pepper(roughly 2/3 of the pepper)
  • 2 jalapeno peppers, seeded and minced
  • 1 1/2 tablespoons minced garlic
  • 3 pounds ground turkey
  • 1/4 cup finely chopped cilantro stems
  • 3 tablespoons chili powder
  • 3 teaspoons unsweetened cocoa powder 
  • 3 teaspoon crushed red pepper
  • 2 teaspoons ground cumin 
  • 2 teaspoon black pepper
  • 2 tablespoon ground coriander
  • 3 teaspoon cayenne pepper
  • 2 tablespoons paprika
  • 1 1/2 teaspoons salt, or to taste
  • 1 tablespoon oregano
  • 1 (28-ounce) can diced tomatoes with their juices
  • 1 (15-ounce) can tomato sauce 
  • 5 cups chicken broth
  • 1 can cooked and drained kidney beans
  • 1 can cups cooked and drained black beans
  • 1/4 cup finely chopped cilantro leaves

Directions (with great pictures)

Heat 2 tablespoons of the oil in a large pot and when hot add the onions and both the red and green bell peppers and cook until vegetables are soft. I recommend using a wooden spoon to stir.


The onions and peppers should loose some of their color when they are soft.


Add the jalapenos and minced garlic and cook an additional 2 minutes. 


Add a little more olive oil to the mix (roughly 2 tablespoons) and then add the ground turkey. Next add the cilantro stems. Be sure you wash them before you cut them up as there is often a lot of stuff in between the stems.


Next up is your seasoning. Add the chili powder, cocoa powder, crushed red pepper, cumin, black pepper, coriander, cayenne pepper, paprika, and salt, and oregano. 

Stir everything into ground turkey and make sure you break up any lumps, until the turkey is cooked through (meaning there is no pink anywhere in the meat). Notice that I have switched from the wooden spoon to a large fork. The fork helps to break up the meat. 


Add the tomatoes, tomato sauce, and chicken broth and bring to a boil. Now is the time to check the heat levels of your chilli. Take your wooden spoon and scoop yourself a sample and place it on a plate/bowl. If you are one of those people that like to eat off the spoon then you need to have another spoon on hand. No double dipping!

If you like it a little hotter, add 1-2 more teaspoons of red pepper flakes and 1-2 teaspoons more of cayenne pepper. Add carefully because the heat will sneak up on you. Reduce heat to a simmer and cook for 20 minutes. Add the kidney beans and black beans and cook about 30 minutes longer. The chilli should start to become thicker.


Lastly, add the cilantro, remove from the heat and let sit for 10-15 minutes before serving. 

I like to eat my chilli with cornbread or over some brown rice. Some popular toppings are sour cream, cheese, and onions (I prefer shallots or green onions). I topped off this serving with some reduced-fat cheddar cheese and a dollop (I just love that word) of sour cream.

If you REALLY want to impress people, make it the night before you're planning to serve it. Dishes always taste better after they sit over night. I served this one year for a Super Bowl gathering it was DEFINITELY a hit.

Tada!


Wednesday, October 10, 2012

Roasted Butternut Squash (A Vegan Friendly Recipe)

I LOVE this time of the year!! The air is crisp and it's just a little chilly but not too cold outside. And it is certainly time for warmer dishes.

One thing that I have learned to appreciate more and more recently is roasting vegetables. It's a very healthy method for preparing food and it's efficient.

On that note, let me share my recipe for roasted butternut squash!!

Preheat the oven to 400 degrees

1 medium butter squash or 2 small ones (tip: If you are not willing to spend the time peeling and cutting the squash many stores sell it already cut up for you. In this case use about 2 pounds of the cut up squash)
4 tablespoons of butter or Earth Balance (Earth Balance is a vegan and gluten free spread)
3 teaspoons of cinnamon
1/2 teaspoon of nutmeg
1/2 teaspoon of cardamom (optional)
2 tablespoons of turbinado sugar or brown sugar
2 tablespoons of raw honey

(Complete these steps if you buy the squash whole and not pre-cut) Peel the outer layer of the squash using a vegetable peeler. Using a large knife, cut the squash in half. Scoop out the seeds and discard.

Cut the squash into roughly 2 inch cubes. Place in a large bowl. 

Melt the butter or Earth Balance. Mix in the cinnamon, nutmeg, cardamon (optional), sugar and honey into the melted butter or Earth Balance. Pour the mixture over the cut up squash and mix well so that each piece is coated.

Place the cut and seasoned squash on a baking sheet, making sure that each piece is touching the baking sheet and not on top of each other.

Roast the squash in the oven for about 35-40 minutes. Be sure to turn the squash over with a spatula about half way through the roasting process (after roughly 20 minutes). The squash should be nice and tender when done.

ENJOY!!!

Monday, October 1, 2012

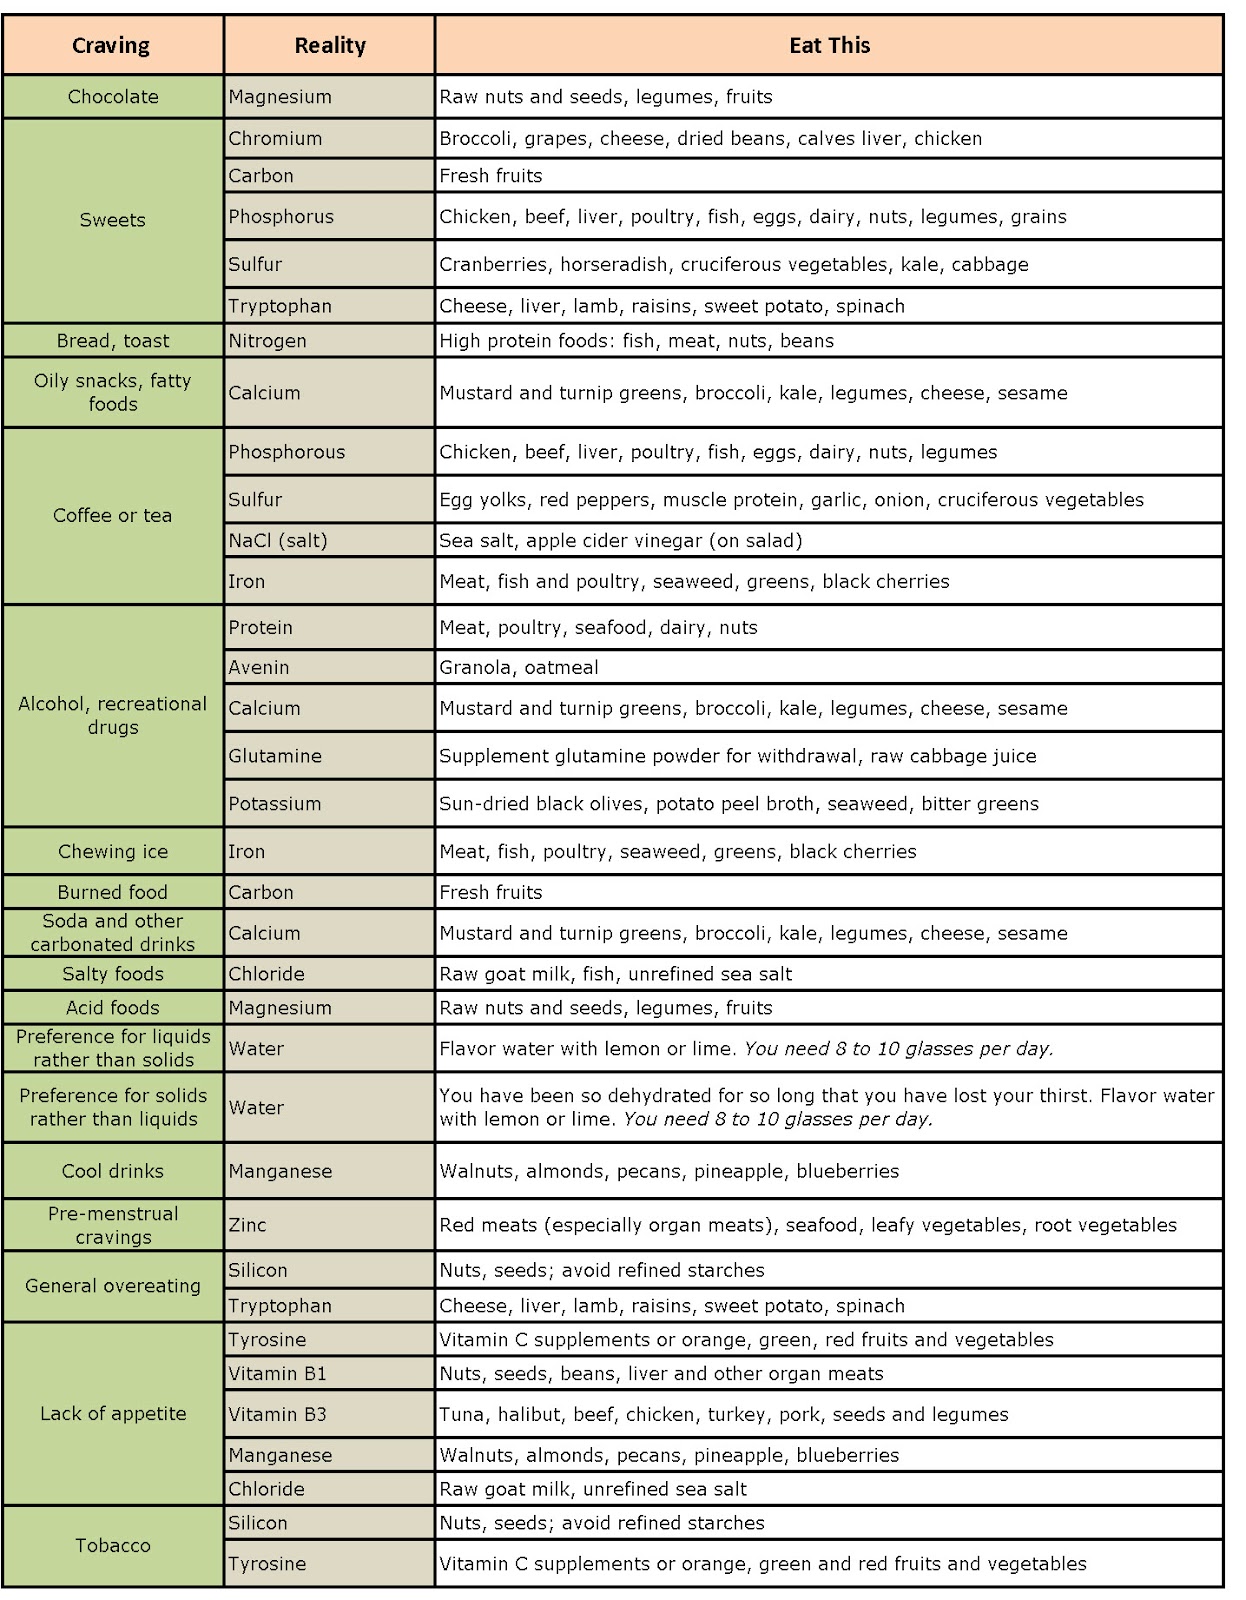
What are you REALLY craving?

I sent this chart out to some family and friends a little while back. I definitely think it's worth reviewing and thinking about, especially when you have your next craving for something that may or may not be what you really need.

Shout out to Sporty Afros for this great information! Sporty Afros - Cravings Posts

Click on chart to make it larger.